InfoTime Support | Workforce Management InfoTime Support | Workforce Management

  • Knowledge Base
  • FAQ
  • Downloads
  • Contact Support
Home / Face Reader, Hardware / Setting the IP Address on a Face Reader

Setting the IP Address on a Face Reader

Pressing the menu key will initiate the administrator verification process. Anybody who is setup as an administrator can now log in. If you haven’t set any additional administrators up simply type in the user ID 7856 and press OK, when prompted enter the password 7856. If the verification is successful, the terminal will allow access to the menu.
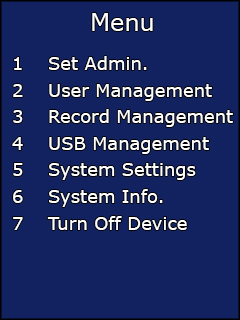
Fig 1

Fig 1


Enter the Menu and select Option 5 – System Settings.

Select Option 2 – Set Network.

Select Option 1 – Set TCP/IP.

Type the IP address into the Input IP boxes using the numerical keypad.

Type the Subnet mask of your network into the Input Mask boxes using the numerical keypad.

Type the Default Gateway of your network into the Input Gateway boxes using the numerical keypad.

Once you have set these details press OK to save it.

CS110CS710Face ReaderSetting IP address Face ReaderHardware

About

View all posts by →

Related Articles

  • Face Reader Terminal Installation
  • Enrolling an Employee on a Face Reader

Search

Help Topics

  • 2Additional Modules
  • 15Common Tasks
  • 8Configuration
  • 4Employee File
  • 3Hardware
  • 5Installation
  • 4Leave Planner
  • 9Navigation
  • 5Schedule Planner
  • 6Timesheet
  • 3Trouble Shooting

Help Topics

  • 2Additional Modules
  • 15Common Tasks
  • 8Configuration
  • 4Employee File
  • 3Hardware
  • 5Installation
  • 4Leave Planner
  • 9Navigation
  • 5Schedule Planner
  • 6Timesheet
  • 3Trouble Shooting

Useful Links

  • Clocking Systems Website
  • Contact Support
  • Staff Pages

Popular Articles

  • Removing an Employee
  • How to Install
  • Working Rules
  • Adding an Employee
  • Applying a Pattern
Flatbase by NiceThemes © 2025. — Powered by WordPress.